 Windows 10 is by far the best operating system that Microsoft managed to release, particularly when compared to users’ experience with the previous versions.
There are specific areas, however, where you will require additional support while using your system running on the OS.
One of them relates to Virtual Private Networks.
You might have come across messages advising Windows 10 users to add a VPN between the computer and the router or modem that the internet service provider (ISP) has provided.
This is to protect your data and offer you much-needed privacy.
If you have subscribed to a good VPN and started using it, you may confront errors when you input requests for accessing the internet.
Here are the steps needed to fix the error and move on with the use of VPN on your Windows 10 computer.
Check to Make Sure You Have the Right VPN Address
This happens with many users. When you subscribe to a VPN service, the provider of the service will give you certain details to set up the connection. Even a minor error in spelling or a wrong entry could result in the error message appearing.
To check it, click on Start;
![]()
go to Settings and choose Network & Internet.
![]()

Once there, select VPN.

You will be shown page with the details you have entered; check if there are any mistakes and ensure that every detail is correct.
Select the Right VPN Protocol
If you have a VPN icon on your desktop, right-click on it and from the menu that pops up, select Properties.

Among the different tabs on this dialogue box, choose Security and under it, a Type of VPN panel will show up; click on Point to Point Tunneling Protocol (PPTP).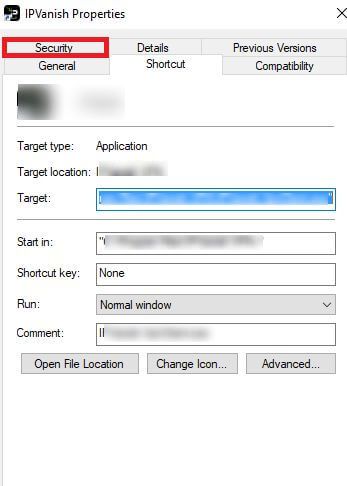
This will ensure there is no error message on this count at least. Check if the router settings are in conformity with the instructions issued by the VPN service provider.
Remove Any Constraint Due to Antivirus Software
Many antivirus software products block the use of VPNs, unless the program has the feature included in it.
You may have to uninstall the antivirus package at least until the VPN error stops appearing and you are able to use the service smoothly.
You can check with the supplier of the antivirus software if there is any adjustment to be made so that both can co-exist and function.
The same goes for the Windows firewall as well. You may find that just disabling the Windows firewall could get rid of the error message your Windows 10 computer.
You can restore these tools later.
See If the Network Is Functioning Correctly
VPN users on Windows 10-run devices have often faced errors related to their network not working.
To know if the error on your display screen is not due to that, go to the Search box by clicking on the Windows key and typing S; a troubleshooter window opens up on this if you type “network troubleshooter” in the box. (Note: The quotation marks here are just to demonstrate and need not be typed while using the system.)

If you find the option “Identify and Repair Network problems” click on it. The troubleshooter will set itself to work on resolving the issue if there is indeed a network flaw.

Eliminate Any DNS Side Defects
The DNS server in Windows 10 is one of the main reasons why people even choose a VPN in the first place. DNS cache, for example, can be the cause of the error appearing on the screen.
Flush Out Your DNS Cache
To flush out the DNS cache, there are a few steps to follow:
1. Use the shortcut route of pressing the Windows key + the letter X.

2. Command Prompt (Admin) is what you must select from the menu you see.
3. Then, type out the following commands:
netsh interface ip delete arpcache
ipconfig /flushdns
ipconfig /renew

4. You have to get out of the function and then restart the system.
5. You should be able to connect to your VPN now, if DNS cache was the real issue.
6. Run a Scan to Detect Malware
This may sound a bit contrary to the third step suggested above, to remove any antivirus program.
In reality, this step is meant to tackle malware if it has entered into your system in spite of your other defense mechanisms, which includes the Windows Defender program.
Luckily, Windows 10 already has a provision within Windows Defender to eliminate malware.
You just have to reach the Windows Defender tool, located inside Settings, and enable it.
With respect to the antivirus package too, you can do a survey and buy and install the best one in the market.
You can run a thorough scan of your system, uninstall the antivirus file when you are trying to connect to the VPN, and then reinstall the file and continue enjoying the security as before.